Pages

Selasa, 03 Agustus 2010

Indonesian Name:
Daun Pandan

English Name:
Pandanus

Functions:
  1. Adds distinct aroma to several foods.
  2. Can heal skin fungus, hypertension, increase appetite, neurasthenia, rheumatism, dandruff, blackened your hair and reduce hair fall. The part that is taken from the plant is the leaf. Usually, the leaf is boiled and you drink the boiled water afterward.
Resource:
  • http://id.shvoong.com/medicine-and-health/alternative-medicine/1967118-daun-pandan-serba-guna/
  • http://www.pdpersi.co.id/?show=detailnews&kode=967&tbl=alternatif

Selasa, 13 April 2010

13 April, 2010

I joined the field trip to Australia and interviewed Kelsey Mcfarlane. She is my host parent's daughter. She is 16 year old and a high school student. The guiding question was: "How does weather affects fashion?" Below are my interview questions and results with her.

1. What do you need to wear during spring?

"In spring, it's still quite cold from winter in Australia. I will wear shorts, maybe short skirt, but I wouldn't wear a singlet because it's still kinda cold."

2. Does the weather affect how you dress? How?

"Yes it does, to an extent. But normally people in high school don't really care what weather it is as long as it looks fashionable. People wear short shorts in a rainstorm."

3. What spring colors do you like?

"Yellow is always nice because it's rather slimming but the earthy colors are always good when it's brown, green, etc.

4. Does the materials for your clothes changes every season?

"You could have a winter outfit made from something that you would like have in a summer outfit. It's just basically the shape of the clothes that would differ."

Below are pictures of outfits sold in Australian shopping centers:


Senin, 07 Desember 2009

3 December, 2009

Today Ibu Lisa told me to search for pictures of clothing according to a given theme. My theme was: "Past, Present, Future". I have to search 3 pictures of that type of clothing for women's and 3 for men's clothing.  Here are my pictures:


Rabu, 02 Desember 2009

1 December, 2009


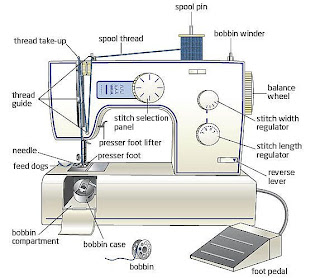
Today I worked with the sewing machine and did different activities, which are:

1. Using a sewing machine:
First, Ibu Lisa taught me how to turn on the sewing machine. To turn it on, I simply switch the "ON" button. Then, she taught me how to start sewing. To sew, you have to press the pedal using one of your foot. Automatically, the machine will start sewing. 

2. Sewing square dot paper:
I first practiced sewing with the sewing machine by using square dot paper as the material to sew on, without the thread inserted in the sewing machine. I have to make a web by following the dots.

3. Inserting thread:
(Look at picture)

4. Sewing fabric:
After I learned how to insert the thread, I began sewing with a fabric. This time, the thread was inserted. What I should do is the same as the previous activity, which is making a web. 

Struggles:
I found some difficulties in threading the sewing machine because there are many steps to do it and it is quiet difficult for me to remember. At first I made a mistake because I missed one step, but then Ibu Lisa told my mistake and I fixed it.

Success:
The successes are: I can accomplish all the activities (turning on the sewing machine, sewing square dot paper, threading the machine and sewing the fabric). Eventhough I struggled in threading the machine, I can still accomplish this task.

What will I do differently:
I will probably listen more carefully to Ibu Lisa's instructions so that I know what to do and can do all the tasks given.

Next goal:
The next goal is to finish the patchwork and to make my own pencil case. In making the pencil case, I will learn about buttoning and zippering.


Senin, 23 November 2009

17 November 2009

1. How did you do:

Backstitch:
First of all, I got a blue fabric with holes in it. I put the thread in the needle and make a knot in the end. From the back of the blue fabric, spare four holes. On the fourth hole, pass the needle through the hole and then pass the needle through the first hole. Since you are in the back of the fabric now, count eight holes from the first hole. Then, pass the needle on the eighth hole. This is how you do backstitch and keep on continuing it.

Join the clothes/fabric: 
  1. First, mix and match the clothes/fabrics.
  2. When you are satisfied, join the clothes/fabrics with pins, leaving one centimeter from the edge of each clothes/fabrics.
  3. Join all of the clothes/fabrics in one line.
  4. When you are done, sew the clothes/fabrics with backstitch technique.
  5. Remove the pins when you are done stitching.
2. What have been the success/struggles:
The success was I am able to do backstitch and also able to combine the fabrics/clothes
together using this new technique. The struggles were, I have to be patient in
accomplishing the backstitch exercise with the blue fabric because the holes are small and
I have to count them in order to do backstitch correctly. Also, I have problems at first in
making the stitches neat and in line when I was sewing the fabrics/clothes together.

3.What can you do differently

For sewing the fabrics/clothes together, I can just simply make a line so that my stitches
will not go off the track and this will help my stitches to become neater and in line.

4. Next goal:


For the next activity, Ibu Lisa will teach me how to do herringbone stitch and blanket stitch

Minggu, 15 November 2009

10 November, 2009


What did I do?:
Today, I made a tie-dye and stencil printing. I am able to do this because Ibu Lisa taught my friends and I to do so. Not just teaching and giving the instructions orally, she also gave a demonstration of how to do it. It was fun!!!

Tie-Dye:

1. First, you plan and design how you want your tie-dye to look like. This includes the pattern and color. I experimented mine by first using a paper tissue as my trial. The pattern that I wanted is a swirl with different colors in each section.

2. When I am satisfied, I tied an old, plain white t-shirt in a knot by using a rubber band. Remember to tie it very tightly or the colors might spread over. I start mine with tying a knot in the middle, and made it into three sections. I did this because I was trying to make a swirl.

3. Then I dip the first section into naphthol, then garam and last water. For the first section, I use the color purple. Naphthol is used as a starter color, that's why you use it in the first place. The color from naphthol is very light. The "garam" that I mean here is not "salt". It is a substance to show the color from the naphthol. Last, water is used to rinse the color. To have a darker color, dip the section again in the same order.

4. For the second section, I used the color red. I used the same technique as I did with the first one.

5. The last section, I used the color yellow and I used the same technique ans I did with the first and second secton.

6. When all the sections are all colored, I untie all the knots.

7. Ta-da!!! It is all done :)


Stencil Printing:

1. First, you prepare a tool to be used as a stamp. I chose onions as my tool because it has some pattern on it.

2. I cut the onion into two parts.

3. I dip one part into a paint.

4. Then, I start stamping them on a fabric.

5. Tha! You just did stencil printing.

Changes:
There are no changes in time to make a tie-dye and stecil printing. The only changes is that I don't try stencil printing. Instead I just watched Ibu Lisa doing it.

Improvements:
The improvements that should be made are the colors. The colors that are provided are only three and it is very limited. For me, the result of my tie-dye is not really good because the color in the middle of my shirt is too large and too dark. It is not what I expect it to be. As an improvement, I need to make my center section in a smaller knot so that the area is not too big and also dip the middle section only once in the naphthol and garam.

Goal for next step:
For the next goal, I am going to learn and make patchwork as a class. Ibu Lisa have a plan to combine each student's patchwork into one big table mat. The basic skills that is needed in this activity is backstitch. This means that I would also learn and gain a new skill, which is backstitch. Not just knowing them, but also doing it.

Senin, 09 November 2009

6 November, 2009

What did I do?: During this period, I learned how to make basic patterns. It was fun but kind of hard because the instructions is a bit confusing and hard to understand. To do the basic pattern, Ibu Lisa gave me a worksheet which has all the instructions in making it. The basic pattern was done in a piece of newspaper. It was folded in two and I only draw in one side because our body is symmetrical. Then I followed the all the instructions given in the worksheet. This activity also relates to the body measurement. 

Changes: I was supposed to finish this in one period but I can't because some of my body measurements are wrong. Because of this, I have to re-measure my body to get the right measurement and continue my work. Also, some of the instructions are a bit confusing and hard to understand. These things took my time and that is why I can't finish this activity in one period.

Improvements: An improvement that I should make is to make sure all my body measurements are correct in the first place. By this, it would save my time and I would be able to finish the activity and submit my work on time within one period.

Goal for next step: Next week, I will learn about tie-dye and stencil printing. I am looking forward to learn about these things and do the activity within the time given.